Android Flashing Guide
From Planet Computers
Contents
Introduction
This document will guide you through the necessary steps needed to install or update Android on your Gemini.
Please note: Installing Android will delete any user data on the device. Please make sure you have a backup of any important data before starting!
There are 3 steps needed to install or upgrade Android on your Gemini:
- Install the FlashTool software on your Windows PC or Linux PC
- Download and unzip the Android firmware
- Flash the firmware on your device
These steps are detailed in the next sections.
Download and Install FlashTool on Windows
The first step to install FlashTool on a Windows PC is to install the flash tool drivers. The drivers are needed for your Windows PC to communicate with your Gemini, the minimum requirement is to have a 64bit Windows operating system.
You can find the latest drivers here: Windows Flash Tool Drivers
Once downloaded, unzip the archive. You will find a folder called FlashToolDrivers, open the folder and double click on the Install (install.bat) file. Allow the installation to complete by clicking Yes when asked to make changes.
Now that the drivers have been installed, you can download the latest Windows flash tool: Windows Flash Tool
Once downloaded the Windows FlashTool, please unzip it to reveal the FlashToolWindows folder. Next, run the flash tool by double clicking on flash_tool (flash_tool.exe) file in the FlashToolWindows folder.
Download and Install FlashTool on Linux
If you intend to install FlashTool on a Windows PC you can skip this section, otherwise please keep reading if you want to install FlashTool on a Linux PC.
The following procedure has been tested on Debian 9.0, Ubuntu 18.04 (see notes below) and Fedora 28 (see notes below).
You can find the latest Linux flash tool software here: Linux Flash Tool
Once downloaded, extract the flash tool by typing:
tar -zxvf FlashToolLinux.tgz
Before running the flash tool you will need to add some rules to udev.
Create the blacklist file by typing (using either the "sudo command" or syntax or simply typing the command as root) :
sudo gedit /etc/udev/rules.d/20-mm-blacklist-mtk.rules
And inside the file put the following 2 lines:
ATTRS{idVendor}=="0e8d", ENV{ID_MM_DEVICE_IGNORE}="1"ATTRS{idVendor}=="6000", ENV{ID_MM_DEVICE_IGNORE}="1"
After that, restart the udev:
sudo service udev restart
Finally, run the flash tool application by entering into the FlashToolLinux folder and typing:
cd FlashToolLinux
sudo ./flash_tool.sh
Notes - Ubuntu 18.04
On Ubuntu you will need to install the following dependency:
sudo apt-get install libjpeg62
Notes - Fedora 28
On Fedora you will have to write the following command to allow applications running with root privileges to access the X server (this will fix the lines above for both the gedit and the flash_tool command):
xhost +local:
Additionally you will have to restart the udev service by typing (or rebooting your machine):
udevadm control --reload-rules && udevadm trigger
Finally, you will need to install the following dependency:
sudo yum install nas-libs-1.9.4-13.fc28.x86_64
Building the flash tool from source
You can also build the flash tool by yourself, the code is hosted on github: Flash Tool Source
Download Android Gemini Firmware
Now that the Flash Tool is running, it is time to download the Gemini Android Firmware from this page
After downloading the firmware, unzip it to reveal the folder containing the firmware folder, for example Gemini_WIFI_MP_09052018 or Gemini_x27_FOTA3_12062018.
Configuring FlashTool
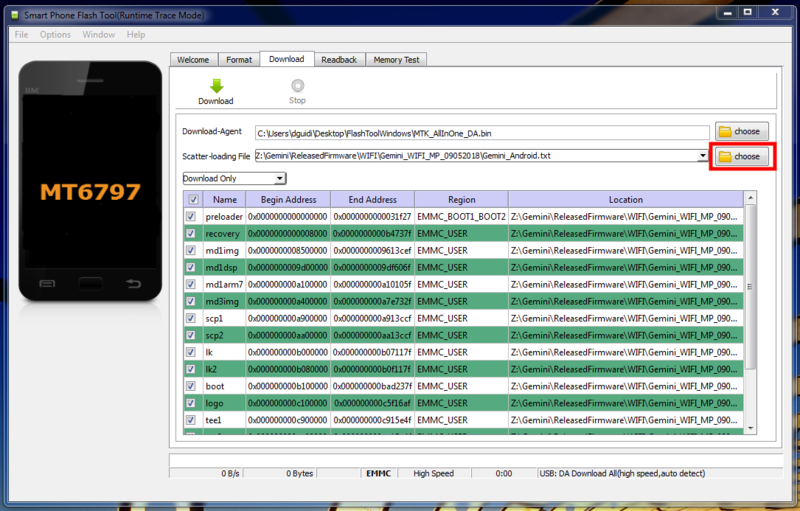
Use the choose button as in the following screenshot to load the scatter file that you will find inside the downloaded firmware. In particular:
- Downlad-Agent should be set to the file MTK_AllInOne_DA.bin, which is located in the FlashToolWindows or FlashToolLinux folder.
- Scatter-loading file should be set to the Gemini_Android.txt file, which is located inside the of the firmware folder that you downloaded.
Backup the NVRAM partition
Before flashing the device with a different firmware it is a good idea to backup the current NVRAM partition. This partition stores key information for your Gemini, including the IMEI number. If it gets lost or damaged, your Gemini will not be able to take or receive calls.
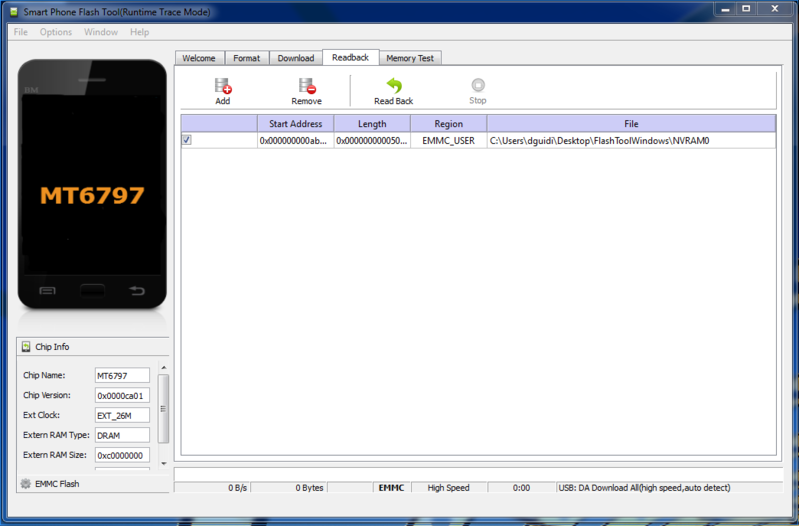
The provided flash tool is already configured for your Gemini. To create a backup of your NVRAM partition, just click on the Readback tab and then on the Add button. A row will appear in the table as in the following screenshot.
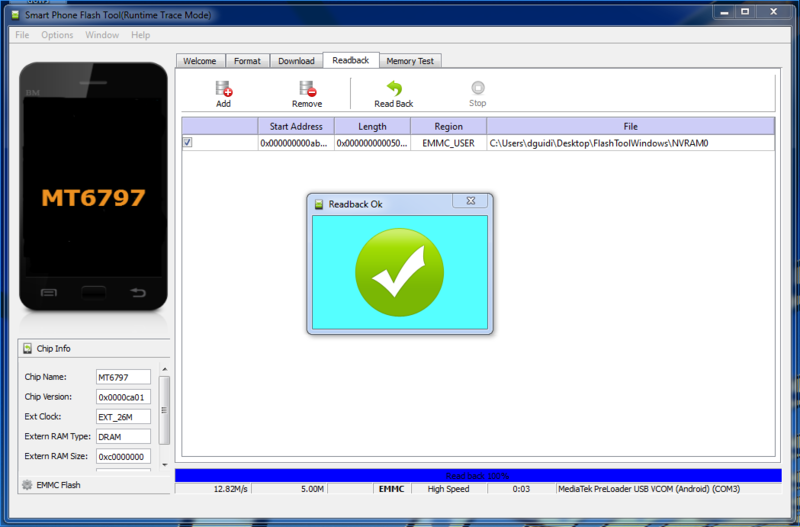
Next, just click the Read Back button, connect your Gemini to your PC and restart the Gemini. Once booting, the flash tool will detect the unit and will write the NVRAM partition on a file on your hard disk called NVRAM0 (see screenshot below). It’s a good idea to keep this file as a backup.
Flashing the Gemini Android firmware
Be sure to follow the previous step to store a copy of the NVRAM partition as backup.Now click back on the Download tab.
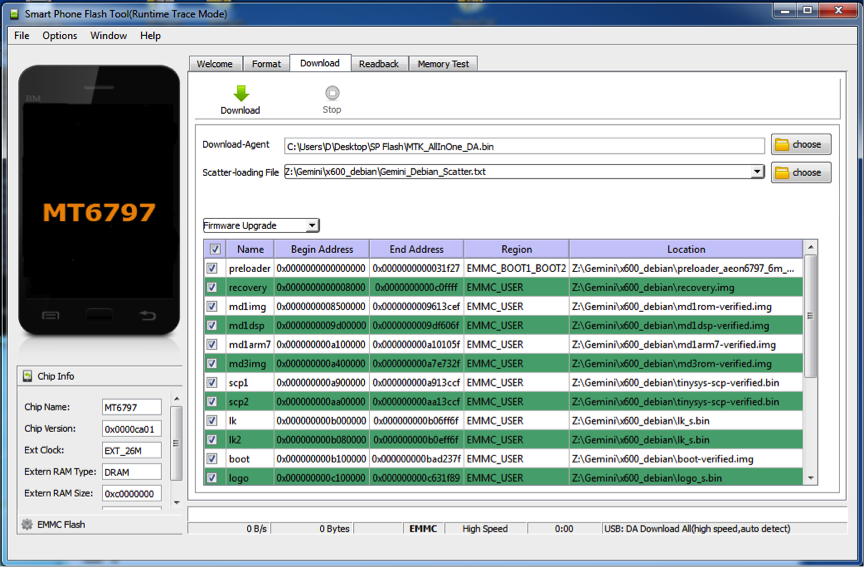
If you want to flash the complete firmware to your unit then select Firmware Upgrade from the drop down menu.This will automatically select all the partitions in the table and it will restore your unit to its factory state. Please note that you will loose all your personal data/settings.
Your screen should appear similar to the following screenshot:
Now, open the firmware folder from the firmware zip file you downloaded and select the scatter file. If you selected an Android firmware, then the scatter file will be called Gemini_Android.txt. If you selected an Android/Linux firmware, then the scatter file name will depend on the space you reserved for them, for example Gemini_x27_A26GB_L30GB_Multi_Boot.txt.
Once you select the scatter file, the table should be populated as below:
Make sure all the partitions are found and are checked. If some partitions are not found (location tab is empty), double checked that you unzipped the Linux module in the firmware folder.
Finally, change the Download Only drop down menu to Firmware Upgrade and click on the Download button. When switching between a standard Android to a dual boot Android/Linux firmware, you must use the Firmware Upgrade mode because you need to format the device and change the partitions.
Connect your Gemini and restart it. As soon as the Gemini is rebooted, the flash tool will detect the device and it will update the OS with the selected firmware.
Manually Update Android firmware
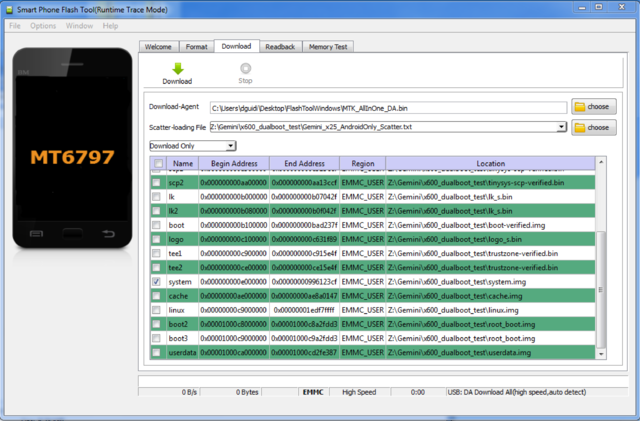
Planet Computers provides over-the-air update for standard Android installations. For custom installation, you will need to manually update the Android firmware.
To update the Android firmware, simply download the latest Android firmware from http://support.planetcom.co.uk/index.php/Gemini_Firmware and use the Download Only option while selecting only the system partition, as in the screenshot below
Linux dual boot notes
The dual boot mechanism works as follow:
- Dual boot Android-Linux firmware
- Press Esc (On) for around one second to turn ON the unit and boot into Android. You should release the Esc (On) button before the screen turns ON, otherwise the unit will boot into recovery mode (see below).
- Press Esc (On) for around one second to turn ON the unit and at the same time press and hold the side button until the screen turns ON to boot into Linux. You should release the Esc (On) button before the screen turns ON, but you must keep the side button pressed until you see the turning ON. When the screen turns ON you can release the side button, and the unit will boot into Linux.
- Press Esc (On) and keep pressing the button until the screen turns ON to boot in recovery mode. At this stage the recovery mode is disabled and you will see a droid image with a red triangle and a "No command" text.


