Difference between revisions of "Cosmo Linux Mobile Data"
From Planet Computers
(Created page with "The following guide will help you setting up mobile data for your Cosmo Communicator under Debian Linux. This guide assumes that you have already installed Linux on your Cosm...") |
|||
| (20 intermediate revisions by the same user not shown) | |||
| Line 3: | Line 3: | ||
This guide assumes that you have already installed Linux on your Cosmo using the [[Linux for Cosmo]] guide. | This guide assumes that you have already installed Linux on your Cosmo using the [[Linux for Cosmo]] guide. | ||
| + | The current Debian/KDE image uses NetworkManager to handle WIFI and mobile data connections, but mobile data is not working correctly when using it under Cosmo. In order to enable mobile data we have to remove NetworkManager and use connman instead. Connman is an alternative connection manager software, which will be used to handle both mobile data and WIFI connection. As connman integration in KDE is not as seemless as NetworkManager it is suggested to proceed only if you need mobile data under Linux. | ||
| + | |||
| + | Please note that Linux expects the SIM to be inserted in slot 0. | ||
| + | |||
| + | ====Install connman==== | ||
On your Cosmo, open a terminal (Menu -> Applications -> System -> Terminal) | On your Cosmo, open a terminal (Menu -> Applications -> System -> Terminal) | ||
| − | |||
| − | |||
Type the following commands to install connman: | Type the following commands to install connman: | ||
| Line 11: | Line 14: | ||
<code>sudo apt install connman cmst mobile-broadband-provider-info ofono-scripts</code><code></code><br /><code>sudo apt remove network-manager plasma-nm</code><br /><code>sudo reboot</code> | <code>sudo apt install connman cmst mobile-broadband-provider-info ofono-scripts</code><code></code><br /><code>sudo apt remove network-manager plasma-nm</code><br /><code>sudo reboot</code> | ||
| + | ====Enable Roaming==== | ||
| + | Roaming needs to be explicitly enabled beforehand if needed. To enable roaming type this command in a terminal: | ||
| + | |||
| + | <code>/usr/share/ofono/scripts/set-roaming-allowed</code> | ||
| + | |||
| + | ====Configure APN==== | ||
| + | The next step is to configure the APN for your specific network operator. For some operator the APN details might be already populated correctly. For some others operators you will have to retrieve the APN details, usually they are found online or by contacting your operator. | ||
| + | |||
| + | To check what APN details are stored, use the list-contexts command and look for the information below /ril_0/context1: | ||
| + | |||
| + | <code>/usr/share/ofono/scripts/list-contexts</code> | ||
| + | |||
| + | [[File:22_46.jpg|center|800x600px|border]] | ||
| + | |||
| + | For example, for the Three UK network we have to setup the access point name "three.co.uk": | ||
| + | |||
| + | <code> /usr/share/ofono/scripts/set-context-property 0 AccessPointName three.co.uk</code> | ||
| + | |||
| + | For Telenor Hungary, the access point name is simply "online", so the command would be: | ||
| + | |||
| + | <code>/usr/share/ofono/scripts/set-context-property 0 AccessPointName online</code> | ||
| + | |||
| + | To double check that the information has been set properly you can use the list-contexts command again: | ||
| + | |||
| + | <code>/usr/share/ofono/scripts/list-contexts</code> | ||
| + | |||
| + | The output of list-contexts should be similar to the output of the screenshot below (see the important bit - AccessPointName = three.co.uk). | ||
| + | |||
| + | [[File:22_46.jpg|center|800x600px|border]] | ||
| + | |||
| + | In some cases you will have to fill in the username and password information too. For example for EE UK you will have to use "eesecure" as username and "secure" as password. You can do that using the following commands: | ||
| + | |||
| + | <code>/usr/share/ofono/scripts/set-context-property 0 username eesecure </code> | ||
| + | |||
| + | <code>/usr/share/ofono/scripts/set-context-property 0 password secure </code> | ||
| + | |||
| + | Once the APN information is set we can activate the connection using the following command: | ||
| + | |||
| + | <code>/usr/share/ofono/scripts/activate-context 1</code> | ||
| + | |||
| + | The command should produce no output and yout connection should now be active. | ||
| + | |||
| + | [[File:22_39.jpg|center|800x600px|border]] | ||
| + | |||
| + | |||
| + | You can use the connman system tray application (cmst) to check the status of the network connection: | ||
| + | |||
| + | <code>cmst</code> | ||
| + | |||
| + | In the Status tab you can see the status of the mobile and WIFI connection. | ||
| + | |||
| + | [[File:22_05.jpg|center|800x600px|border]] | ||
| + | |||
| + | The screenshot above shows a working mobile connection (State: Online). | ||
| + | |||
| + | The Details tab provides additional information as shown in the screenshot below. | ||
| + | |||
| + | [[File:22_19.jpg|center|800x600px|border]] | ||
| + | |||
| + | |||
| + | |||
| + | Your settings will be stored and the system will try to re-established the last connection at login. After a reboot, you can also re-enable the connection manually by issuing the activate-context command again: | ||
| + | |||
| + | <code>/usr/share/ofono/scripts/activate-context 1</code> | ||
| + | |||
| + | Note that you might also be required to send the set-roaming-allowed command if using the device while roaming. | ||
| + | |||
| + | ====Running cmst at login==== | ||
| + | Because cmst will be used to handle both mobile and WIFI connection, it's a good idea to run automatically it at every login. To do that, Go to Menu -> Applications -> Settings -> System Settings. | ||
| + | |||
| + | [[File:22_04.jpg|center|800x600px|border]] | ||
| + | |||
| + | Inside System Settings, select "Startup and Shutdown", tap on the "Add Program..." button, type "cmst" and tap on the OK button. | ||
| + | |||
| + | [[File:22_58.jpg|center|800x600px|border]] | ||
| + | |||
| + | The program will now be executed at every login. | ||
| + | |||
| + | [[File:22_34.jpg|center|800x600px|border]] | ||
| + | |||
| + | ====Known bugs and limitations==== | ||
| + | * Linux mobile data is still experimental at this stage, and not all features are enabled. | ||
| + | * Thetering functionality is not currently working. | ||
| + | * SIM must be insterted in slot 0, eSIM chipset is not currently working in Linux. | ||
| + | * Powering OFF and ON the mobile chipset using cmst does not always work as expected - in this case a reboot will fix the issue. | ||
| + | * CoDi external screen not yet working in Linux | ||
| + | |||
| + | ====Troubleshoot==== | ||
| + | If cmst shows a working connection but you can't browse the Internet, it might be because the DNS has not been automatically populated. In this case you can set one using the following command: | ||
| − | + | <code>sudo echo "nameserver 8.8.8.8" > /etc/resolv.conf</code> | |
Latest revision as of 10:50, 24 July 2020
The following guide will help you setting up mobile data for your Cosmo Communicator under Debian Linux.
This guide assumes that you have already installed Linux on your Cosmo using the Linux for Cosmo guide.
The current Debian/KDE image uses NetworkManager to handle WIFI and mobile data connections, but mobile data is not working correctly when using it under Cosmo. In order to enable mobile data we have to remove NetworkManager and use connman instead. Connman is an alternative connection manager software, which will be used to handle both mobile data and WIFI connection. As connman integration in KDE is not as seemless as NetworkManager it is suggested to proceed only if you need mobile data under Linux.
Please note that Linux expects the SIM to be inserted in slot 0.
Contents
Install connman
On your Cosmo, open a terminal (Menu -> Applications -> System -> Terminal)
Type the following commands to install connman:
sudo apt install connman cmst mobile-broadband-provider-info ofono-scriptssudo apt remove network-manager plasma-nmsudo reboot
Enable Roaming
Roaming needs to be explicitly enabled beforehand if needed. To enable roaming type this command in a terminal:
/usr/share/ofono/scripts/set-roaming-allowed
Configure APN
The next step is to configure the APN for your specific network operator. For some operator the APN details might be already populated correctly. For some others operators you will have to retrieve the APN details, usually they are found online or by contacting your operator.
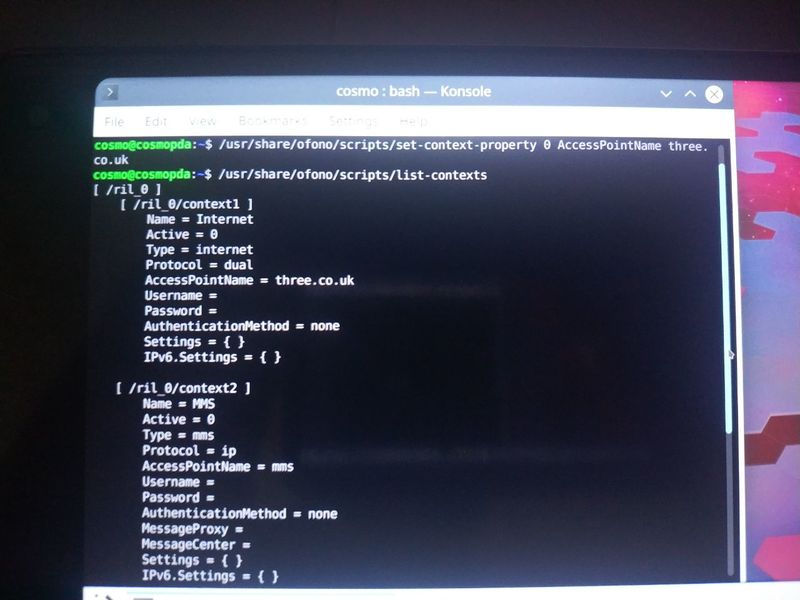
To check what APN details are stored, use the list-contexts command and look for the information below /ril_0/context1:
/usr/share/ofono/scripts/list-contexts
For example, for the Three UK network we have to setup the access point name "three.co.uk":
/usr/share/ofono/scripts/set-context-property 0 AccessPointName three.co.uk
For Telenor Hungary, the access point name is simply "online", so the command would be:
/usr/share/ofono/scripts/set-context-property 0 AccessPointName online
To double check that the information has been set properly you can use the list-contexts command again:
/usr/share/ofono/scripts/list-contexts
The output of list-contexts should be similar to the output of the screenshot below (see the important bit - AccessPointName = three.co.uk).
In some cases you will have to fill in the username and password information too. For example for EE UK you will have to use "eesecure" as username and "secure" as password. You can do that using the following commands:
/usr/share/ofono/scripts/set-context-property 0 username eesecure
/usr/share/ofono/scripts/set-context-property 0 password secure
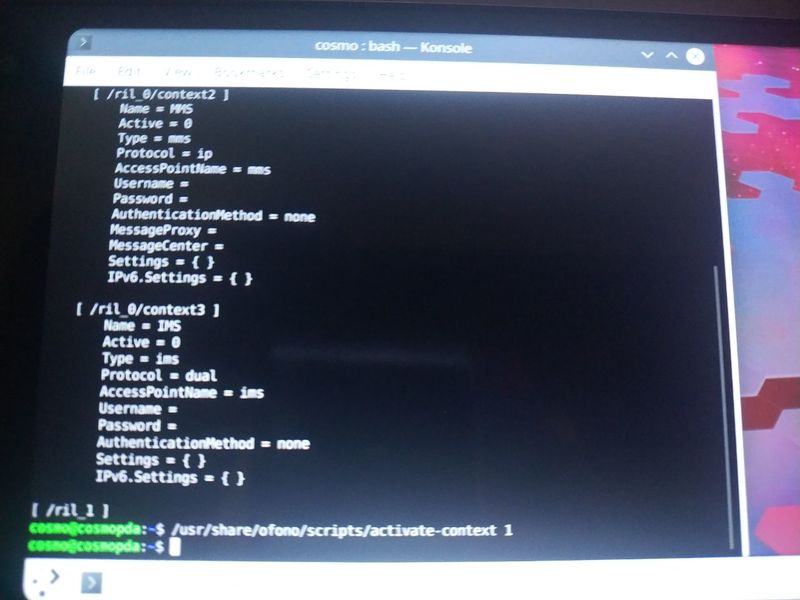
Once the APN information is set we can activate the connection using the following command:
/usr/share/ofono/scripts/activate-context 1
The command should produce no output and yout connection should now be active.
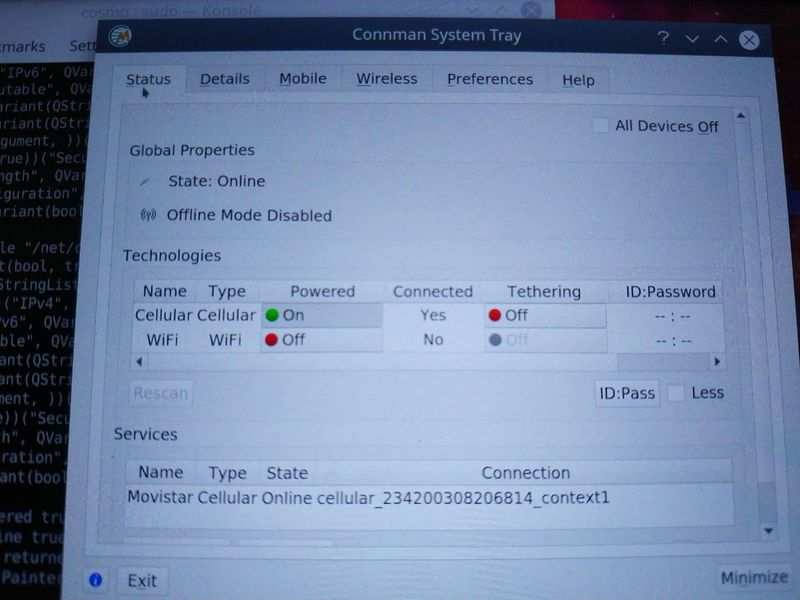
You can use the connman system tray application (cmst) to check the status of the network connection:
cmst
In the Status tab you can see the status of the mobile and WIFI connection.
The screenshot above shows a working mobile connection (State: Online).
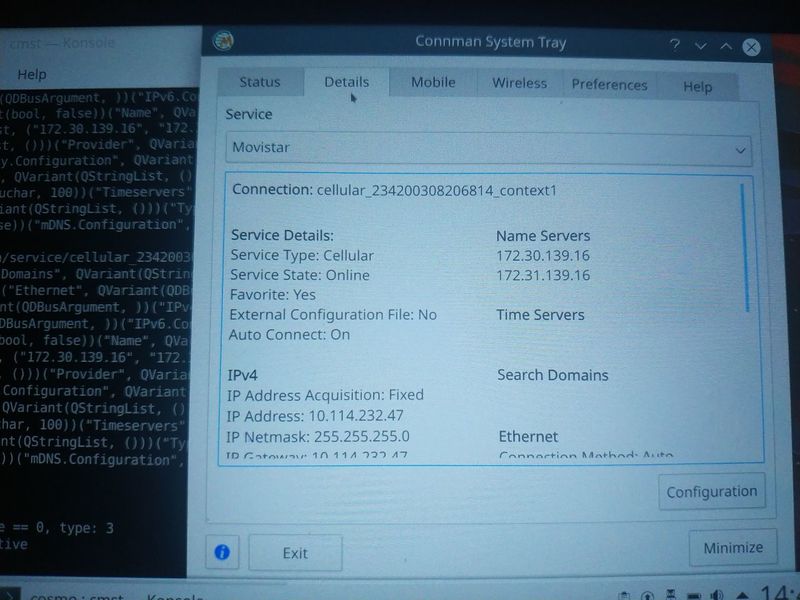
The Details tab provides additional information as shown in the screenshot below.
Your settings will be stored and the system will try to re-established the last connection at login. After a reboot, you can also re-enable the connection manually by issuing the activate-context command again:
/usr/share/ofono/scripts/activate-context 1
Note that you might also be required to send the set-roaming-allowed command if using the device while roaming.
Running cmst at login
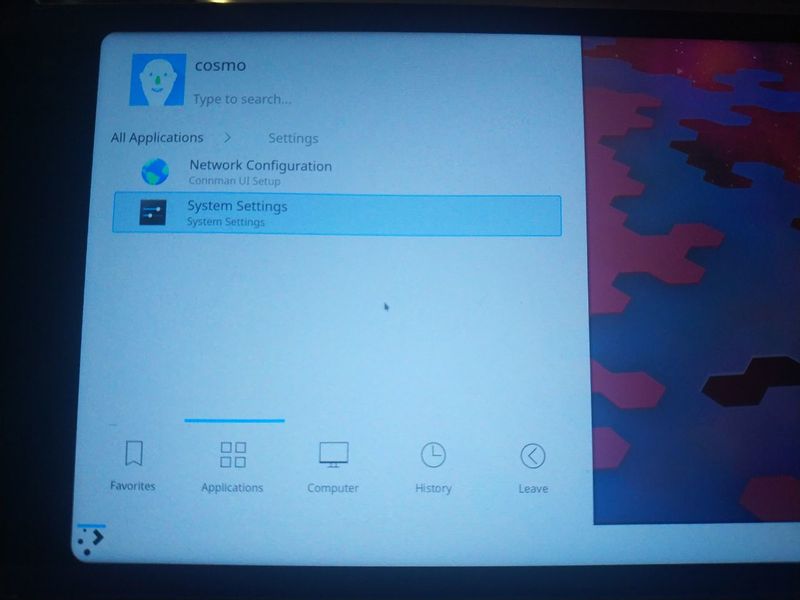
Because cmst will be used to handle both mobile and WIFI connection, it's a good idea to run automatically it at every login. To do that, Go to Menu -> Applications -> Settings -> System Settings.
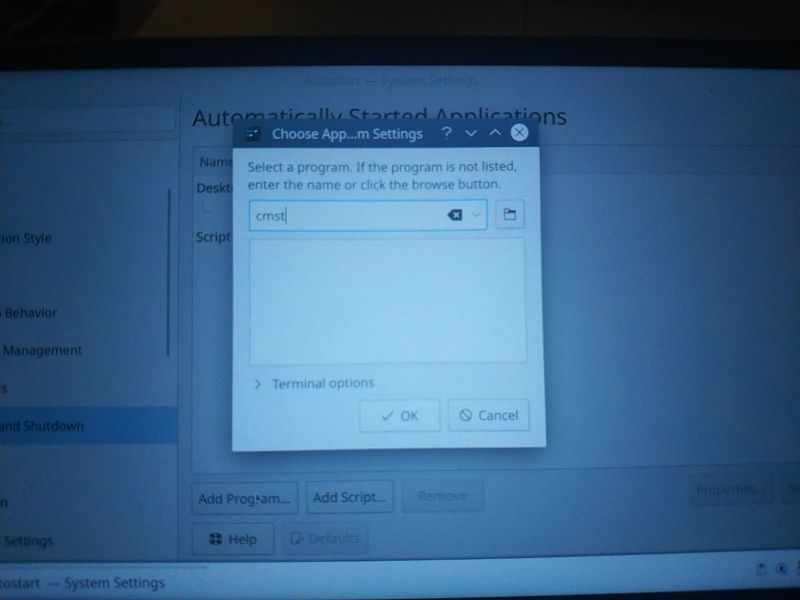
Inside System Settings, select "Startup and Shutdown", tap on the "Add Program..." button, type "cmst" and tap on the OK button.
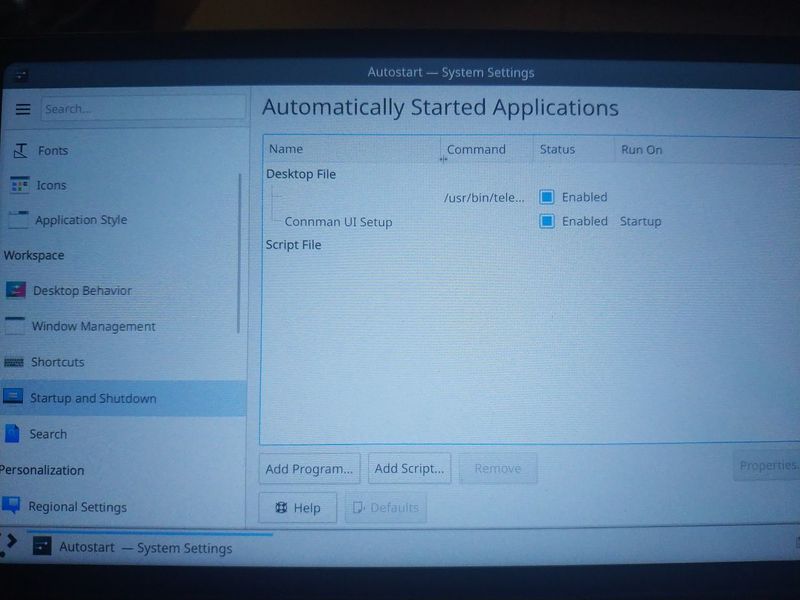
The program will now be executed at every login.
Known bugs and limitations
- Linux mobile data is still experimental at this stage, and not all features are enabled.
- Thetering functionality is not currently working.
- SIM must be insterted in slot 0, eSIM chipset is not currently working in Linux.
- Powering OFF and ON the mobile chipset using cmst does not always work as expected - in this case a reboot will fix the issue.
- CoDi external screen not yet working in Linux
Troubleshoot
If cmst shows a working connection but you can't browse the Internet, it might be because the DNS has not been automatically populated. In this case you can set one using the following command:
sudo echo "nameserver 8.8.8.8" > /etc/resolv.conf


