Recovery Fix Android 8
From Planet Computers
Contents
Introduction
This document is only to be used by users who downloaded an early Android 8 over the air update, where the recovery partition might have been corrupted.
Please navigate through Settings->System->About Phone->Wireless Update and make sure your Current version is like in the following picture.
If your current version matches this line, then proceed and please note that this process will NOT delete your data from the device.
Download and Install FlashTool on Windows
The first step to install FlashTool on a Windows PC is to install the flash tool drivers. The drivers are needed for your Windows PC to communicate with your Gemini, the minimum requirement is to have a 64bit Windows operating system.
You can find the latest drivers here: Windows Flash Tool Drivers
Once downloaded, unzip the archive. You will find a folder called FlashToolDrivers, open the folder and double click on the Install (install.bat) file. Allow the installation to complete by clicking Yes when asked to make changes.
Now that the drivers have been installed, you can download the latest Windows recovery fix flash tool: Recovery Fix Flash Tool
Once downloaded the Windows FlashTool, please unzip it to reveal the RecoveryFixAndroid8 folder. Next, run the flash tool by double clicking on flash_tool (flash_tool.exe) file in the RecoveryFixAndroid8 folder.
Download and Install FlashTool on Linux
If you intend to install FlashTool on a Windows PC you can skip this section, otherwise please keep reading if you want to install FlashTool on a Linux PC.
The following procedure has been tested on Debian 9.0, Ubuntu 18.04 (see notes below) and Fedora 28 (see notes below).
You can find the latest Linux recovery fix flash tool software here: Recovery Fix Flash Tool
Once downloaded, extract the flash tool by typing:
tar -zxvf recoveryFixLinux.tgz
Before running the flash tool you will need to add some rules to udev.
Create the blacklist file by typing (using either the "sudo command" or syntax or simply typing the command as root) :
sudo gedit /etc/udev/rules.d/20-mm-blacklist-mtk.rules
And inside the file put the following 2 lines:
ATTRS{idVendor}=="0e8d", ENV{ID_MM_DEVICE_IGNORE}="1"ATTRS{idVendor}=="6000", ENV{ID_MM_DEVICE_IGNORE}="1"
After that, restart the udev:
sudo service udev restart
Finally, run the flash tool application by entering into the RecoveryFixAndroid8 folder and typing:
cd RecoveryFixAndroid8
sudo ./flash_tool.sh
Notes - Ubuntu 18.04
On Ubuntu you will need to install the following dependency:
sudo apt-get install libjpeg62
Notes - Fedora 28
On Fedora you will have to write the following command to allow applications running with root privileges to access the X server (this will fix the lines above for both the gedit and the flash_tool command):
xhost +local:
Additionally you will have to restart the udev service by typing (or rebooting your machine):
udevadm control --reload-rules && udevadm trigger
Finally, you will need to install the following dependency:
sudo yum install nas-libs-1.9.4-13.fc28.x86_64
Flashing the Recovery Fix firmware
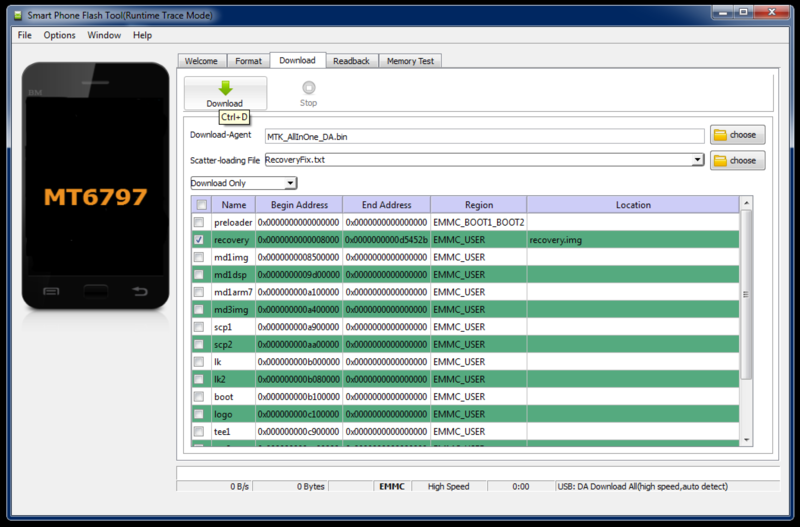
The configuration tool is already preconfigured with the right options, as in the picture below.
To start the flashing process, just click the big Download button, connect your PC to the left end USB-C port on your Gemini and restart the Gemini. Once booting, the flash tool will detect the unit and will start flashing the device with the selected firmware.
Once flashed, simply disconnect the Gemini and keep pressed the Esc (On) button until your Gemini turns ON.


